


The first solution to try when the old belt is too small is to loosen the bolts on the motor mount and slide the motor closer to the fan as possible to see if the belt will slip-fit on the pulleys. If that doesn’t work its time to surrender muscle to brainpower and calculate the size of a new belt.
When it’s time for a new belt, be sure to size and select the right new belt for the job. Your choice will be critical to the long-term performance of the system. Let’s take a look at how to resize a belt and the steps it takes to be sure the job is done right the first time.
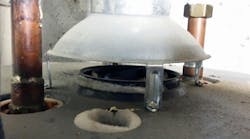
Inspect the Drive Assembly
Start by inspecting the existing belt, motor, fan and pulleys. Check to be sure the original belt’s groove size fits the pulleys and make sure the bearings, shafts and set screws are in good condition and secure.
At the same time, inspect the motor mount, the fan and housing to be certain they will remain in good working order after the new airflow is set so the equipment will be able to operate long term. We’ve all serviced equipment, only to have it die an awful death a short time later. Nobody’s happy when that happens, so look past the new belt.
Record the old belt number written on the exposed surface of the belt. This is your best reference to find the original size, type and length of the belt. If you don’t have the replacement belt on your truck, these numbers come in handy for the shop guys or the belt supplier to verify your measurements by cross referencing the belt number with the manufacturer’s catalog. A faded page in a manufacturer’s catalog is more accurate than field belt and pulley measurements any day.
Calculate the New Belt Size
Now it’s time to use the “other tool,” a math formula to determine the size of the replacement belt. It’s recommended that you work the formula a few times before you try it in the field, just so you’re familiar with the math. Practice makes perfect.
Several measurements are required to complete the replacement belt formula. Measure and record the distance between the motor shaft and the pulley shaft, and then measure the diameter of the motor pulley (also called the drive pulley or sheave), and the fan pulley (called the driven pulley).
Apply the following formula to determine a new replacement belt length:
Belt Length = 2C + [1.57 x (D1 + D2)] + 1-in.
C = The distance between the Center of the motor and fan shafts.
D1 = The Diameter of the small pulley (where the belt actually rides on the pulley).
D2 = The Diameter of the large pulley (where the belt actually rides on the pulley).
The math is quite easy; it simply includes adding and multiplying. Here’s a completed formula to walk you through the steps:
Example:
C = (12-in.) Distance between shafts
D1 = (3-in.) Diameter of the small pulley
D2 = (8-in.) Diameter of the large pulley
New Belt Length = 2C + [1.57 x (D1 + D2)] + 1-in.
2(12-in.) + [1.57 x ( 3-in.+ 8-in. )] + 1-in.
24-in. + [1.57 x 11-in.] + 1-in.
24-in. + 17.27-in. + 1-in. = 42.27-in.
So, select a new belt the next length at or just above 43 inches.
Be sure to inspect the motor mount to see how much distance the motor can be forward or backward if the exact belt size is not available.
Next, determine the thickness of the belt. This is determined by measuring the cross section of the belt. Be careful, old belts may be badly worn so the dimension may not be accurate. State the new belt size by stating its length and its cross section determined the old belt’s model number.
The key to success when selecting replacement belts is a huge inventory, or a great counter guy or gal at your power transmission distributor. They know the right questions to ask and can almost finish your sentences once they understand your needs. Each is worth their weight in adjustable pulleys.
Tips for Adjusting Belt Tension and Alignment
When increasing pulley size, always check amp draw immediately after making the change. Remember, amps increase at the cube of airflow, so a 10% increase in airflow may increase the power the motor draws by more than 30%. Pulley adjustments can be hazardous to the health of your motor. Do not leave a motor operating at more than full load amps.
Always measure fan RPM after installing a new belt. Check the fan speed against the manufacturer’s fan data to be certain you don’t go over the fan curve. Airflow may decrease with an increase in fan speed under certain conditions.
Adjusting the motor mount is accomplished by loosening the bolts that hold the motor onto the motor mount. Next, slide the motor closer to or farther away from the fan until the correct belt tightness is achieved, then tighten the bolts on the motor mount to hold the motor in place and keep the belt tight.
Sometimes you’ll need to loosen the setscrews on the pulley and slide them along the shaft until the pulleys line up with each other. Alignment increases efficiency and prolongs the life of the belt and pulleys.
How tight should the belt be adjusted? Too tight, and the power consumption may increase and equipment life could decrease. Too loose, and the belt squeals and slips. There are tools available to measure belt tension so you can be assured of the right belt tightness.
The rule to use for belt tightness is that belt deflection with the correct pressure applied should be 1/32nd of the distance between the shafts of the fan and the motor. For example if there is 16-in. between shafts, belt deflection should be 16-in. divided by 32 or ½-in.
One last tip: With blower motors over 10 Horse Power, it’s recommended that a good quality belt changeout include a second visit a day or two later to tighten the stretched belt by adjusting the motor mount. The belts do stretch and need to be tightened to perform their best.
Rob “Doc” Falke serves the industry as president of National Comfort Institute an HVAC based training company and membership organization. If you're an HVAC contractor or technician interested in a free procedure on belt sizing, contact Doc at [email protected] or call him at 800-633-7058. Go to NCI’s website at nationalcomfortinstitute.com for free information, articles and downloads.
