Service Clinic: Preventive Maintenance is Good For Optimal Hydronic System Performance
I’m old enough to recall telling customers who had early-generation atmospheric gas boilers that it might be years before they’d need to call my company for a maintenance visit. Those boilers were designed to go a long time without supervision.
However, as the market has pushed the need for higher-efficiency equipment, such as condensing, fully modulating systems and a wide range of system components that optimize system performance, the need for routine hydronic system maintenance is greater.
We all know that a substantial amount of hydronic system costs are related to poor maintenance. Fixing a problem caused by lack of maintenance can cost 10 times in the emergency mode what routine maintenance would’ve fixed in the preventive mode. And more than system operation is at stake: safety is also a key concern.
Here are some basic guidelines about what to look for on a routine visit to a customer’s hydronic system.
Look at the Big Picture
Many hydronic system problems stem from mistakes made during installation, so the first order of business in establishing a preventive maintenance schedule is to take in the big picture. Stop, look, and listen. The system will tell you a lot about itself. Its hum, hiss, gargle or clank are all telling clues.
Look closely and record in the maintenance log what you see (and hear) with regard to the system piping, venting, and gas or oil supply.
The boiler check-sheet can and should be used to check system performance and to spot trends that affect operating pressure for a steam boiler, operating temperature for hot water systems, stack temperature, and water-level controls. Completion of a check-sheet not only records the basic situation as you see it today, it also sets a baseline for later maintenance and service calls — whether they’re routine or generated by a no-heat call.
Key categories for routine maintenance include:
- Venting
- Combustion air
- Gas or oil supply, piping and/or filtration
- Water quality and piping
- Electrical wiring and diagnostics
- Controls.
Let’s take a look at these areas.
VENTING. First of all, a lack of screws in sheet metal flue-pipe joints should be corrected on the spot. The condition of metal flues — visual and physical — is critical for safely transporting exhaust from appliance to chimney.
Once upon a time, checking venting meant pulling the flue pipe from the chimney and cleaning out all manner of debris: dead birds, wasps, chipmunks, and anything else that may have crawled, flown, or fallen in. White, chalky joints gave clues to flue-gas condensation.
Then came moderately high-efficiency boilers, classified as high-efficiency in those days, that introduced us to a new phenomenon: sustained flue-gas condensation, which can wreak havoc with masonry chimneys. It pays to check the home’s exterior face of the chimney (if flush with the brick wall) for signs of damage. A chimney liner may have been overlooked (or deliberately avoided in order to be the low bidder). Unlined brick chimneys, common in early 1900s vintage homes, need liners.
With the steady march upward in combustion efficiency, chimneys were abandoned, and that practice often left a standard gas tank-style water heater orphaned with its tiny flue pipe attempting to overcome cold air within the chimney to establish draft. A direct-vent model or, better yet, a tankless water heater, may be an easy up-sell.
When servicing today’s indirect vent (exhaust only) and direct-vent (both combustion exhaust and fresh air intake) equipment, you’ll need to know how much cubic volume is required to safely provide sufficient combustion air from the indoor area where the appliance resides. Both types have specific safety guidelines for clearances from doors, windows, gas meters, snow, etc.
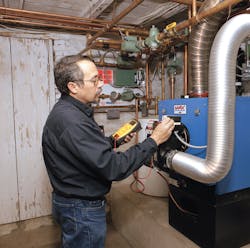
COMBUSTION. Check and clean the burner. Check for any blockage of combustion air openings. Check the free flow of air into atmospherically fired boiler rooms. For ducted combustion units, check for blockages. Clean and check the filters. Use your combustion analyzer; it’s among the most valuable tools in your truck.
Examine the safety controls, any of which can deactivate the burner: limit switches, flue gas roll-outs, etc. If it’s an oil system, check the cad cell fire eye and the fuel line filter.
GAS OR OIL SUPPLY PIPING AND FILTRATION. Check gas pressures while at peak load to determine if there’s a measurable reduction. This answers questions about a boiler’s ability to meet heat demand.
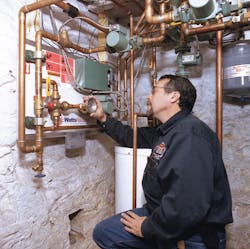
CIRCULATOR AND ZONE VALVE OPERATION. Is there any leakage at the flanges or stems? Do the valves open and close as zoned areas call for heat?
EXPANSION TANK. A large increase in pressure within the boiler — say into the 22+ psi range — may mean the tank has lost its air charge. Re-charge it. Or, if the Schrader valve spits water, the bladder has been compromised and it’s time to replace the tank.
Air vents and air eliminators. Check for proper installation and operation.
HYDRONIC GLYCOL. Check fluid Ph with an electronic meter or chemical test kit (test strips are least reliable). You’ll need to know if the fluid has degraded. It may need to be recharged.
. Open the valve slightly to purge stagnant water and clear the valve of debris, but know that older valves might start leaking water when tested. Valves that leak need to be replaced. We often reduce homeowner unhappiness with that by including replacement, free of charge, within service contracts.
SHUT-OFF OR DRAIN FAUCETS. Fix or replace them if they’re dripping. Usually, though, it’s just the stem or washer (although that may also require a full-system drain).
WIRING. Pay particular attention to the wiring to the zone controls.
VALVES. Check the water inlet, shut-off to the expansion tank, iso valves, return line bypass valves, and all zone and loop shut-off valves.
BASEBOARD RADIATION. Make sure the radiators are open, clean, and unobstructed by furniture or debris.
Finally, be sure to remove all air from the zone lines and replace the batteries in programmable T-stats.
Technicians Build Trust
It’s worth mentioning that technicians in the field always have a much better chance of convincing homeowners of the value in swapping-out tired, old system components — or even the boiler itself — when troubles or compromised operation is encountered. The technicians have built relationships with the homeowners and have won their trust, so we believe that they should be the ones at least to broach the topic when Band-Air repairs reach the end of their usefulness, or when lack of system efficiency may justify replacement work.
Technicians should be able to ask homeowners, “Are you OK with your fuel bills?” or, “Are you satisfied with your comfort and system operation?” Coming from the technician they’re familiar with, these questions often lead to work that’s tailored to the homeowner’s best interests — work the technicians are well-trained to do.
Who knows? The homeowners may also take an interest in new, programmable system equipment and T-stats that can be monitored and operated from a smart phone or iPad. It’s a whole new world of possibilities.


