Coils and Condensate Pans Need Extra TLC in Your PM
Article has been updated to include original photography
Increasing energy costs and indoor air quality (IAQ) issues have made preventive maintenance (PM) more important than ever for commercial building owners. Once thought of as an optional —or even unnecessary — expense, most building owners today are aware that PM can actually save thousands of dollars in manpower and equipment replacement costs.
Periodic checks of HVAC equipment throughout-its seasonal operation are essential to good maintenance, and most technicians do fine with the basics of cleaning blower wheels or fan blades, inspecting belts, and changing air filters.
However, two important maintenance steps — cleaning coils and taking care of condensate pans — deserve more attention than ever in this era of heightened IAQ awareness.
A Breeding Ground
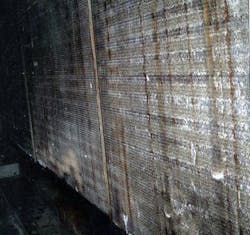
It's well known that the dark, damp conditions that exist within HVAC units can contribute to the formation of bacteria, fungus, and other microbes. These undesirables can cover metal surfaces with a thin, almost invisible layer. In more advanced stages, the coating can be thicker and easily seen.
Fouled coils lead to increased pressure drop across them. Increased pressure drop increases fan horsepower requirements, which, in turn, draw more power, increasing current consumption.
Pressure drop measurements across the coil when it is new are a valuable baseline for performance. Differential pressure that increases by more than one-and-a-half to two times definitely indicates problems with coil cleanliness.
For these reasons, cleaning cooling coils should occupy center stage on your PM task list.
Challenges and Strategies
It can be difficult to clean coils effectively, due, in part, to coil design. For multiple row coils, the copper tubing is staggered, and this prevents a stream of water from entering into the coils too deeply. In most cases, the water velocity penetrates only the first few inches of a coil, which isn't far enough to loosen deposits deep within the coil.
Here are some rules to follow when cleaning coils:
- Hot water works better than cold water.
- Foaming cleaners are generally better than non-foaming cleaners to remove biofilm and other deposits.
- Certain areas of the coil may have more deposits than other areas. A gentle flush of water through the coil may identify areas that are particularly fouled.
- Cleaning from the bottom of the coil to the top is recommended. Multiple cleanings of the coil may be necessary due to heavy deposition, or where coils have not been treated previously with an after-market micro-coating.
- After completion of cleaning, again run the hose through the coil to see if water now flows freely through areas previously found to be restricted.
- Coil cleaners may be either acid, neutral, or alkaline. Many manufacturers call neutral pH or alkaline pH cleaners "non-acid" cleaners. Both acid and alkaline cleaners will attack coil fins, causing pitting and other corrosion. To reduce this problem, rinse the coil copiously with water to neutralize any chemical residual left on the coils. Then spray a micro-coating onto the coils to reduce future build up. It's important that any coating applied to coils doesn't cause water droplets to form on the coil surface. Those droplets can be blown off by the fan and cause microbial growth downstream in the system.
Condensate Pans
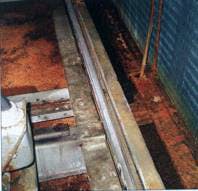
Just as clean coils play an important part in air quality, so does the condition of condensate pans. Condensate pans should be clean and free of deposits and dirt. Often there is biological growth in the condensate pan that is responsible for odors and for plugging up the drain lines of the unit. These can cause overflows and accompanying property damage.
Condensate drain lines should be insulated from the unit to the drain to avoid water condensation on their surfaces. Often, drain lines become kicked or damaged. Check for the integrity of the drain lines themselves.
Water lying around the air handler is generally indicative of condensate pan leaks, valve leaks, or a stopped up condensate drain line.
Once the protective zinc layer of a galvanized surface is gone on a condensate pan, corrosion of the steel beneath it will proceed quickly, resulting in pinhole leaks in the pans. All too often, the condensate pan corrodes long before the HVAC unit itself needs to be replaced. Today, replacing a functioning air handler just because of a ruined condensate pan is not necessary. The pan can be easily resurfaced without removing it from the air handler, often allowing owners several more years of equipment life.
Using a chemically-resistant pan resurfacing material specially engineered for condensate pans will retard corrosion, prevent leaks and extend the life of your customer's system.
You can save your customers thousands of dollars through a quality HVAC PM program. The product of a well-run PM program is a system that consistently satisfies the air conditioning needs of building occupants' equipment, runs efficiently and cost-effectively, and lasts its expected lifespan.
Lynn Burkhart is the president of Controlled Release Technologies, Inc., Clearwater, FL., a supplier of HVAC maintenance products since 1983. He can be reached at 727/572-7119.
Robert Plaskon works as an HVAC engineering manager for a major Florida resort. He is a licensed Florida certified general contractor, air conditioning contractor, and plumbing contractor. Plaskon can be reached at 407/247-6581.

