Equipment Delta T Measurement Solutions
Temperature measurement and diagnostic questions keep the phones, texts, FaceTime, and emails humming here at National Comfort Institute.
One of our favorite calls is from technicians who question their thermometer readings for the first time. We love this kind of call because it confirms a technician stepped up to a new level of diagnostics. Accumulated knowledge is whispering, “This measurement doesn’t feel right; there’s more going on than my thermometer is telling me.” When this moment happens, we witness the birth of a master technician.
Let’s review the most common temperature measurement problems we hear about and resolve at NCI tech support.
Test Instruments
Good test instruments are essential for reliable temperature readings. Inferior quality instruments lead to unreliable measurements that derail diagnostics. Fortunately for you, temperature instrument technology continuously evolves. As a result, their cost is lower while quality is up. Perhaps it’s time for you to upgrade.
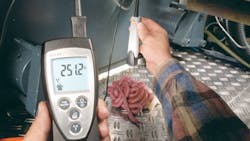
Select a thermometer that responds to temperature changes quickly. The readout should display to the tenth of a degree (0.1°). Minimum instrument accuracy should be ± 2% with a temperature range of at least 20° to 180°F. Some thermometers have extendable probes that you can insert into the air stream.
Several manufacturers build dual probe models that measure equipment temperature change: one for the equipment inlet and the other for the outlet. The instrument also does the math for you.
Poor quality or uncalibrated thermometers give you inaccurate readings. If your temperature readings are off, your calculations and diagnosis will be too.
What about using two different thermometers? Make sure they read the same temperature under the same test conditions.
Poor quality or uncalibrated thermometers give you inaccurate readings. If your temperature readings are off, your calculations and diagnosis will be too. Unfortunately, the repairs you prescribe will fail to solve the problem. If a problem existed at all.
Timing
The primary function of heating and cooling equipment is to change temperature. Therefore, testing with equipment operating makes accurate temperate testing a moving target.
Some equipment passes through several stages as it ramps up. Make sure you test after the system has stabilized. Ideally, the system should operate for 15 minutes before testing.
Also make sure the equipment doesn’t shut off during testing. This can be challenging to detect because the fan keeps running and gives the appearance of an operating system. Keep an eye on rapidly changing temperatures. They could indicate a compressor or burner has shut off. Adjust the thermostat to an extreme temperature so the system keeps running to prevent this issue.
Ideally, you’ll test with multiple thermometers or probes displaying on your phone. This lets you watch and capture equipment entering and exiting temperatures simultaneously. Be aware, when the equipment is operating, supply and return air temperatures constantly change.
Probe Location
Remember how it feels on a chilly winter day when you walk from the shade into the sun? Although the air temperature around you is the same, you felt the sun’s radiant heat warming you.
The same principle applies to a temperature probe when testing near the equipment. Heat exchangers and heat strips emit radiant heat and evaporator coils send out radiant cooling.
Your thermometer probe absorbs these radiant effects. As a result, the instrument changes the displayed air temperature as they blend. This is a false reading.
If you’re unaware of this field effect, you can misinterpret your air temperature readings. The solution is to insert your thermometer probe in a location where it cannot “see” the radiant source. The air temperature reading will then be accurate.
Here’s an example. You measure supply air temperature where air leaves the cooling coil., The air temperature measures 52°F. One foot from the coil, the temperature measures 53°F. Two feet from the coil, 54°F. Three feet from the coil and out of sight of the coil, the air temperature is 57°F. This is the actual air temperature -- the other readings include radiant effects.
To put this into perspective, let’s assume you have a 20° temperature drop across the coil. The air temperature difference between the false reading of 52° near the coil and the actual air temperature reading of 57° is 5°. If you divide the 5° temperature measurement error by the 20° equipment temperature change, the difference is 25%. A temperature reading 25% higher than reality trashes your diagnostics and may lead to repairs that are not necessary or make the problem worse.
The typical technician response is to assume the equipment is fine and assures the customer all is well. Not so. If the next technician makes the same temperature measurement mistake, the problem persists. The hard truth is that the customer can be held hostage by repeated false temperature measurements.
I encourage you to install a series of test ports every 12” downstream from a cooling coil and document the effects of radiant heat for yourself. After you do, you’ll always be sure to measure temperatures in a location where the sensor is unaffected by the impact of radiant heat or cold.
Equipment Return Air Temperature Issues
Air temperature measurements on the return side of equipment also suffer from unseen effects that throw off your diagnosis.
Should there be a return duct leak from an unconditioned space near the test location, air temperature pulled into the system may be a very different temperature, causing a false reading. Measure several feet downstream from the duct leak to allow both air temperatures to mix. This will increase measurement accuracy and correctly capture the return duct leak temperature impact.
The outcome of testing air temperature near an outside air inlet when the outdoor temperatures are quite different from the return air temperature may have a similar impact.
Use caution when you measure in the blower compartment because the blower motor radiant heat may also deteriorate air temperature accuracy.
Airflow Assumptions
Don’t forget HVAC temperature diagnostics will be inaccurate unless you include the impact of air volume. As airflow increases, temperature change decreases. As airflow decreases temperature change increases. This is true in heating or cooling mode.
HVAC temperature diagnostics will be inaccurate unless you include the impact of air volume.
Unless you verify airflow, you’re just guessing, and the odds are your diagnostics will lead you to recommend repairs that will not solve the problems you were called for.
Next time you measure temperature, perhaps the principles in this article will come to mind. If so, adjust your test locations and diagnostics to avoid sentencing your customers more time in discomfort prison in their own homes.
Rob “Doc” Falke serves the industry as president of National Comfort Institute, Inc., an HVAC-based training company and membership organization. If you're an HVAC contractor or technician interested in a free temperature test procedure, contact Doc at [email protected] or call him at 800-633-7058. Go to NCI’s website at nationalcomfortinstitute.com for free information, articles, and downloads.