Very small room pressure differences make a big difference in how a building operates. Bathrooms, for example, need an exhaust fan to keep the bathroom under negative pressure compared to the rest of the house. The negative pressure in the bathroom keeps shower steam and bathroom odors from entering the main house.
When solving a ventilation problem, you can test room pressure difference before and after you solve a problem and document your work results. Room and building pressure testing are also required by code and in many balancing reports.
Once you take the time to learn and practice this room test procedure, you'll add this additional arrow in your quiver as you test, diagnose, and repair room pressure problems. Unfortunately, these solutions may be invisible to you right now. Let's look at this and several other applications for room and building pressure testing and how it can be done in just a few minutes.
Test Instruments
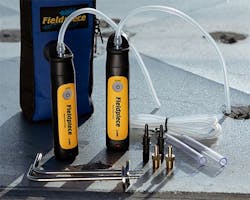
The proper test instrument and accessories make all the difference. A reasonable quality digital manometer with a zero to five inches water column (w.c.) test range will do the job. The readout must be down to .01-inch for testing purposes. Avoid meters with higher pressure ranges because you'll sacrifice accuracy at lower pressure levels.
If you are testing indoors to outdoors, you will also need a pressure buffer or filter to reduce wind effects on your pressure readings.
Pressure Measurement Units
Traditionally, inches of water column is the U.S. HVAC pressure measurement that technicians use to measure room pressure differences. A common room differential pressure measurement may be .02" w.c. This is a slight pressure differential.
You may also use a unit of measurement called Pascals (Pa). Pascals is the preferred European pressure unit. There are 250 Pa in 1-in. w.c. When measuring room pressures, you can speak in whole numbers using Pa. A room pressure of .02-in. w.c. equals five Pa.
A good manometer can measure pressures in both units at the flip of a switch.
In addition to pressure unit measurement terms, you'll also want to become familiar with the phrase "With Reference To," often abbreviated as WRT. This refers to the pressure difference of one room with reference to another room.
For example, the operating room's pressure, with reference to the hallway, is -.02-in. w.c.
Room pressures are also labeled as Neutral Pressure (no pressure difference), Negative Pressure when the room is under negative pressure (a bathroom, with an exhaust forcing air outdoors). Or a Positive Pressure (a bedroom with a supply register only and no return, like a balloon blowing up.)
Some rooms require positive pressure, and some rooms require negative pressure. A positive pressure room has more air entering than exiting. A negative room has more air exiting than entering.
Test Procedure
The following steps will apply to most room pressure testing, although it may need to be adapted to fit some unusual circumstances. If testing in a clean room, additional steps may be required to meet sanitation standards.
First, identify from the plans, specifications, or applicable regulations what the required pressure difference is between the room you're testing and the neighboring room or area.
Before testing, verify the room and building operating conditions. Usually, these are the "normal" daily operating pressure conditions. Assure the doors are open or closed as required and that all associated fans and equipment are in full operation before taking pressure readings. You may take some sample tests to evaluate the pressure changes that may occur as doors are opened and closed, and appliances, equipment, or auxiliary fans are turned off and on.
Before testing, turn on the manometer without any hoses attached to ensure the manometer reads zero pressure. If not, zero the instrument before any testing is started.
Connect the pressure tube to the positive port (usually on the top or left side) of the manometer and then place the open end of the tube in the With Reference To room and leave the negative port on the manometer open to the room you're testing.
Carefully close the door between the rooms without pinching the tube to avoid false readings. Then allow the room pressures to stabilize.
Read and record the pressure differential between the two rooms. The manometer is a differential pressure gauge, and the pressure difference between the two rooms will appear on the instrument's readout.
Compare the room pressure difference to the required room pressure differential.
If the pressure does not meet the code or specification, ventilation system adjustments must be made to increase or decrease room pressure.
To increase room pressure, increase supply airflow. To decrease room pressure, increase return or exhaust airflow. Or you can take the opposite steps in the referenced pressure room.
Indoor to Outdoor Building Pressure Test
When a room's pressure is stated with reference to outdoors, a few steps may be added to the testing.
Follow the steps listed above, but run the tubing from indoors to the outside, at least 10 feet from the building. Be sure to shelter the end of the tubing from the wind.
Last week, I recommended that a geologist in Palo Alto, CA, pull a water bottle from under the seat of his truck, drill a hole the size of his pressure tubing in the lid and poke a few holes in the bottle. This inexpensive accessory reduced the effects of wind on his building pressure test.
Furthermore, you'll find it is challenging to run a tube under an outside door without pinching it. You can add a piece of metal tubing under the door and attach both ends of the tubing to it to prevent pinching.
Read and record the pressure difference between indoors and outdoors. Compare the measured to required pressure differential and make airflow change recommendations to solve the problem.
Increase building pressure by adding outside air to the return side of the system. You can do this, for example, by using an economizer. To decrease building pressure, you can add an exhaust fan to the building.
Visual Testing
Most HVAC professionals confirm their building pressure readings with a simple visual test. I recommend using this test, especially when you are still learning how to do room and building pressure testing. Why? Because it's hard to be sure if you connected the tubing to the correct port on the manometer or not.
This simple visual test is as follows: Crack a door open about a half-inch, light a match and blow it out. If the room or building is under negative pressure, the smoke is pulled inside. If it is under positive pressure, the smoke will blow out.
Remember, room or building pressures are invisible. You'll "see" the changes (as slight as they may be) and learn through pressure testing. Please note that pressure constantly changes in a building, and that can impact your readings. Experiment by turning fans on and off and by opening and closing doors.
As your experience increases with room pressure testing, your judgment and ability to interpret readings will grow rapidly. Enjoy your newfound ability to discover and solve room pressure problems that were previously invisible to you.
Rob "Doc" Falke serves the industry as president of National Comfort Institute, Inc., an HVAC-based training company and membership organization. If you're an HVAC professional interested in a free procedure to measure room pressures, contact Doc at ncilink.com/ContactMe or call him at 800-633-7058. Go to NCI's website at nationalcomfortinstitute.com for free information, articles, downloads, and current training opportunities.
About the Author
Rob 'Doc' Falke
President
Rob “Doc” Falke serves the industry as president of National Comfort Institute an HVAC-based training company and membership organization. If you're an HVAC contractor or technician interested in a building pressure measurement procedure, contact Doc at [email protected] or call him at 800-633-7058. Go to NCI’s website at NationalComfortInstitute.com for free information, articles and downloads.

