Diagnose Indoor Coil Condition Using Manufacturer Pressure Drop Tables
Checking an indoor coil to see if it is clean or dirty can be time-consuming and challenging. It doesn't have to be that way. Did you know you can quickly measure pressure drop and determine coil condition using manufacturer coil pressure drop tables? Let's look at how to check coil condition without tearing the equipment cabinet apart.
Step One: Measure Fan Airflow
It's important to keep the coil pressure drop measurement in context. By itself, the reading can be misleading. To prevent confusion, compare pressure drop against how much airflow the air-handling equipment is moving.
Before you diagnose coil condition, you first need to measure fan airflow. The easiest and quickest way to start is with total external static pressure (TESP) and the manufacturer's fan table. To receive a one-page procedure on how to plot fan airflow, send me an email at the address shown at the end of this article.
A more reliable method is to use a dedicated test instrument like the Digital TrueFlow from The Energy Conservatory. Since it's a direct measurement, there isn't any room for misinterpretation of issues affecting your TESP reading, like a dirty blower wheel or using the wrong fan table.
Step Two: Find the Indoor Coil Installation Instructions
Once you know fan airflow, record the indoor coil model number. If the air handling equipment has an external coil, the model number is
Next, you need to find the indoor coil installation instructions. They include the pressure drop tables you need. Some instructions are with the equipment; others you'll need to download from the manufacturer's website. Once in hand, find the coil's model number to narrow down the options listed in the installation instructions.
Find the indoor coil installation instructions. They include the pressure drop tables you need.
Sometimes, you won't be able to find a visible coil model number. This is common with air handlers and package units because the coil is internal to the equipment. The manufacturer includes the pressure drop in the equipment rating and rarely publishes tables for them. There are also times when you can't find the information. You can still diagnose the coil condition if you're in this situation. I'll cover how in step five.
Step Three: Wet or Dry
You'll notice wet and dry rating conditions as you look at the manufacturer coil data. So, you'll also need to determine the coil's state before you measure pressure drop. This is easy to do.
If the system is operating in cooling mode, be sure it runs for a minimum of 10 minutes so the coil is wet. Equipment with variable speed fans should also run at 100% of the programmed airflow. Some ramping profiles could keep the fan at lower speeds for over 10 minutes. If you test in the heating mode, the coil will be dry.
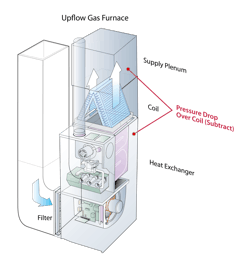
Step Four: Measure the Coil's Static Pressure Drop
To measure indoor coil pressure drop, install 3/8-in. test ports before and after the coil. Carefully inspect before you drill test ports. You don't want to puncture a heat exchanger, drain pan, or refrigeration tubing.
Attach a hose to each pressure tap of your manometer. Then insert a static pressure tip into the opposite end of each hose. Place the static pressure tip from one hose into your test port before the coil and the other static pressure tip from the remaining hose into your test port after the coil. Be sure to face the tip into the airflow. The measured coil pressure drop will appear on the manometer display.
Step Five: Compare Measured Pressure Drop to the Manufacturer Table
Measured coil pressure drop should be very close to design pressure drop published in the manufacturer tables. Find the model number on the manufacturer coil table that matches the coil you tested. Next, pinpoint the coil's wet/dry condition and fan airflow you measured. The coil's design static pressure drop is where the two points intersect.
If you can't find a model number or the equipment is an air handler or package unit with an internal coil, you can use 40% of the air handling equipment's maximum rated external static pressure (ESP) as a guide.
For example, let's say you have an air handler with a maximum rated ESP of .50-in. w.c. on the data plate. Multiply .50 times 40% to estimate a clean coil pressure drop of .20-in. w.c. (.50 x 40% = .20). If the measured pressure drop is higher, it's time for a visual inspection of the coil.
What if the Pressure Drop is Out of Range?
It is common to encounter situations where the design coil pressure drop doesn't match what you measure in the field. Often, the measured pressure drop is higher. This can happen for several reasons that are installation related. Some typical reasons are::
- Flanges not bent out on the coil cabinet
- Restrictive duct transitions to the coil
- Improperly blocked off sections on the coil discharge
- Trash in the duct system caught in the coil
- Dirty indoor coil
- Improper fan airflow (too much)
- Incorrect coil model number used
- Coil undersized for the equipment.
When pressure drop is high, offer coil cleaning or appropriate repairs. Be sure to test in and test out to prove the cleaning or repair worked. If the coil is undersized or too restrictive, look for a coil that has a lower pressure drop. If you're planning to replace a coil, you can use the coil tables to prevent installing a brand-new restrictive coil.
Sometimes, measured coil pressure drop will be much lower than the manufacturer's table. It's probably too good to be true. If you encounter this, dig deeper. Excessively low pressure drop is often due to air bypassing the coil or an airflow measurement error.
Keep the Tables in Context
Whatever you do, don't use coil pressure drop tables in reverse to determine fan airflow. That will lead to an inaccurate measurement. When you look at a coil table, you'll notice that airflow increases as coil pressure drop increases. This is where it gets tricky – the tables assume a brand new, clean coil.
Don't use coil pressure drop tables in reverse to determine fan airflow. That will lead to an inaccurate measurement.
Let's say you measure a pressure drop five years after the coil was installed and find a high pressure drop. Using the coil table to determine fan airflow will fool you into thinking the fan is moving a lot of air. In reality, there's a coil restriction, and fan airflow is low.
Keeping the tables in context is a valuable tool to aid you in airflow diagnostics.
David Richardson serves the HVAC industry as National Comfort Institute, Inc. (NCI) director of training. NCI specializes in training that focuses on improving, measuring, and verifying HVAC and Building Performance.
If you're an HVAC contractor or technician interested in learning more about static pressure, contact David at ncilink.com/ContactMe or call 800-633-7058. NCI's website www.nationalcomfortinstitute.com is full of free technical articles and downloads to help you improve your professionalism and strengthen your company.
About the Author

David Richardson
Director, technical curriculum
David Richardson is the vice president of training at National Comfort Institute, Inc. (NCI), Avon, Ohio. NCI specializes in training that focuses on improving, measuring, and verifying HVAC and Building Performance.