Vapor-Compression Refrigeration Cycle Components: How Compressors, Condensers, Metering Devices, and Evaporators Work Together
Key Highlights
- This article connects core refrigeration principles — heat transfer, phase change, and refrigerant states — to the physical components that make systems run.
- Each major part of the vapor-compression cycle performs one essential task—raising pressure, rejecting heat, lowering pressure, or absorbing heat.
- Understanding what each component does—and why—helps HVACR professionals diagnose issues, improve efficiency, and explain system operation with confidence.
Last month, we revisited the fundamentals of refrigeration. That article established the thermodynamic foundation HVACR professionals rely on every day — how heat differs from temperature, why heat naturally moves from hot to cold, and how refrigerants exploit phase changes to absorb and reject large amounts of energy efficiently. It also introduced critical concepts such as saturation, superheat, and subcooling, which describe the refrigerant’s condition throughout the cycle. With those principles in place, this next article shifts the focus from theory to hardware, breaking down the key components that make the vapor-compression refrigeration cycle work in real-world HVACR systems.
Vapor-Compression Refrigeration Cycle Components
As said before, there are four elements of the vapor-compression refrigeration cycle:
● Increasing pressure
● Rejecting heat (+ condensing)
● Decreasing pressure
● Absorbing heat (+ vaporizing)
Turns out that the four main components of the refrigerant circuit perform one of these functions each.
Increasing Pressure: Compressor
When people talk about the compressor, they often call it the heart of the refrigerant circuit. It’s actually quite an apt metaphor; the compressor pumps the refrigerant from the low-pressure side of the system to the high-pressure side, just as your heart takes in oxygen-poor blood and pumps oxygen-rich blood. Just as there would be no blood circulation without the heart, there would also be no refrigeration without the compressor to provide that pressure differential.
Inside the compression chamber, the refrigerant is squeezed into a small space, such as via reciprocating pistons or oscillating scrolls. Squeezing molecules into a tight space raises the pressure, since they’re all colliding with each other and the walls of the compression chamber. Fitting all those molecules into a tighter space with all that collision will also make them move even faster, so the compressor raises the pressure and temperature at the same time.
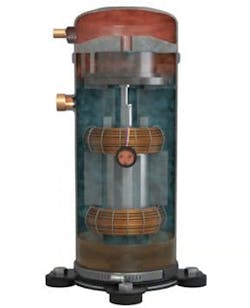
When the refrigerant enters the compressor, it’s a cool superheated vapor. When the refrigerant exits the compressor, it’s a hot, high-pressure superheated vapor, significantly hotter than the air around the compressor.
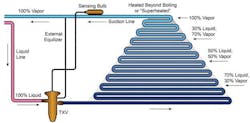
Rejecting Heat: Condenser
Once the hot, high-pressure vapor leaves the compressor, it travels to the condenser coil. The condensing unit has a fan that pushes air over the coil. This air is cooler than the refrigerant inside the coil, so, because heat moves from areas of higher temperature to lower temperature, the refrigerant gives off its heat to the air. If you hold your hand over a condensing unit while it’s running, you’ll notice that the discharge air is warm; that’s the heat being rejected from the refrigerant. That’s why we call the condenser the heat rejector.
As the condenser rejects heat, the refrigerant inside it goes through three main stages as it condenses from a vapor to a liquid. In a typical finned-tube coil, those stages are as follows:
- Top rows: Desuperheating (100% vapor);
- Middle rows: Condensing (liquid-vapor mixture); and
- Bottom rows: Subcooling (100% liquid).
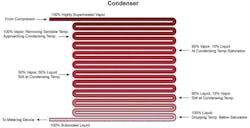
The refrigerant enters the condenser as that hot, high-pressure superheated vapor from the compressor. The first several degrees of cooling will just reduce the temperature of that vapor until it reaches saturation and becomes a liquid-vapor mixture (desuperheating). Then, heat rejection will contribute entirely to changing the vapor-liquid mixture to a complete liquid (condensing); there will be no drop in temperature. These phase changes take a lot more energy than just reducing the temperature, so this stage will take up the bulk of the space in the condenser. Even when the refrigerant becomes fully liquid, that liquid will still be warmer than the air around it, so the heat rejection that occurs in the bottom rows of the condenser will reduce the temperature of that liquid refrigerant in a process called subcooling.
It’s also worth noting that ground and water-source heat pumps use a different type of heat exchanger, usually a plate or coaxial heat exchanger instead of a condensing coil, that forces air over it with a fan. The function is essentially the same; the heat is rejected from the refrigerant and absorbed by the earth or water. A secondary fluid, like water or glycol, might also be used in chiller applications.
Dropping Pressure: Metering Device
Even though the refrigerant has become a liquid and cooled down a lot, it’s still warm and at a relatively high pressure when it exits the condenser. In order to drop below the indoor temperature (or box temperature or whatever is being cooled), the pressure needs to drop. That’s where the metering device, the pressure dropper, comes in.
Dropping the pressure gives the liquid molecules more room to move, so they’re less tightly packed. A metering device achieves this by forcing the refrigerant through a small opening or restrictor; pressure backs up against the orifice on the inlet side and then is relieved on the outlet side, allowing the refrigerant to expand on that other side. During this process, the pressure drop also drops the boiling point of the refrigerant, so some of the faster-moving molecules will boil off right away; this is called “flash gas.”
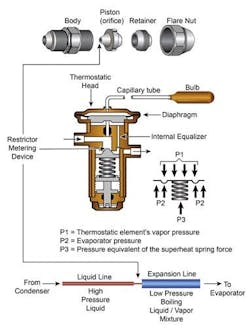
There are a few different types of metering devices. There are fixed-orifice pistons, which are just chunks of brass with a small opening for refrigerant to flow through; in heat pumps, these can seat or unseat to allow refrigerant to flow through them or bypass them depending on the operating mode. Thermostatic expansion valves (TXVs) are mechanical devices that modulate to maintain a specific superheat; a combination of opening and closing pressures determines the size of the opening. The opening force comes from a bulb mounted to the suction line, which contains refrigerant that expands or contracts with changes in temperature and applies more or less pressure accordingly.
Absorbing Heat: Evaporator
Once the refrigerant is cool and [mostly] liquid again, it’s ready to absorb heat! That’s where the evaporator, also known as our heat absorber, comes in.
Like the condenser, the evaporator is in a location where fans or a blower push air over its coils. The air is warmer than the refrigerant, so the refrigerant absorbs its heat. Since the air loses its heat, it can cool its enclosed space when it’s recirculated. As the refrigerant absorbs the heat, it doesn’t change temperature; that constant temperature is called the saturation temperature or evaporator temperature.
Instead of changing temperature, the refrigerant boils off in the bottom and middle rows of the evaporator. Again, we can move so much more heat by allowing that phase change to happen, so we need to make sure we’re feeding the evaporator enough refrigerant to absorb as much heat as possible without having any liquid refrigerant come out and make it to the compressor. (That’s a bad day.)
Once the refrigerant has fully boiled off, it will be superheated, but it’ll still be cool enough to absorb some heat, though not as much as in its saturated state. Any heat absorption that happens when the refrigerant is 100% vapor will be sensible, meaning it will raise the refrigerant’s temperature and not contribute to boiling or any phase change.
Connecting the Components
The components don’t generally directly connect (except when the metering device feeds directly into the evaporator coil). They are connected by lines, all of which carry liquid OR vapor,and sometimes one that carries a liquid-vapor mixture.
Evaporator → Suction Line → Compressor: Superheated Vapor
Refrigerant entirely boils off in the evaporator and travels to the compressor via the suction line. As a result, the suction line is filled with superheated vapor, just like the discharge line. However, the superheated vapor in the suction line is much cooler than the vapor in the discharge line.
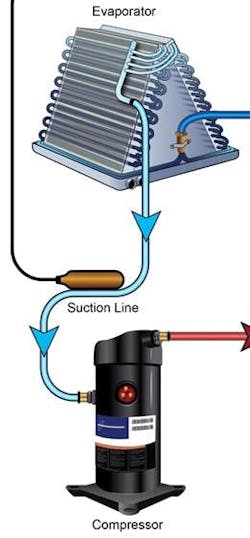
There may also be a temperature difference between the evaporator outlet and the compressor inlet, even though the suction line is insulated. We call the superheat measured at the evaporator outlet evaporator superheat, and the superheat measured at the compressor inlet, you guessed it, compressor superheat.
Evaporator superheat can give you a better idea of how efficiently your system is moving heat; we want the number to be above zero, but lower values indicate higher efficiency. High superheat indicates that the refrigerant is boiling off quickly and moving a lot of sensible BTUs; it’s starving, often due to refrigerant undercharge or a restriction. On the opposite end, a lower evaporator superheat indicates that we’re feeding more refrigerant into the coil, so it has more room to boil off and move more heat from the air that passes over it. When the superheat is too low, that means we’re feeding too much refrigerant into the evaporator. This is the lowest superheat reading in the system.
We especially don’t want too low superheat at the compressor because that means we have a higher risk of liquid getting into the compression chamber. Liquid is nowhere near as compressible as vapor, and HVAC/R compressors can be damaged if they try to compress it. That’s why the compressor superheat is a useful reading; it tells us about our risk of flooding the compressor. A superheat of zero is very bad, as that means we definitely have liquid getting into the compression chamber, and premature failure is likely. The compressor superheat should be higher than the evaporator superheat, but it’s not the highest in the system.
Compressor → Discharge Line → Condenser: Superheated Vapor
The compressor is connected to the condenser by the discharge line. Since the compressor rapidly raises the pressure and temperature of the refrigerant, the Refrigerant in this line is a very hot superheated vapor. This superheat will be the highest in the entire system.
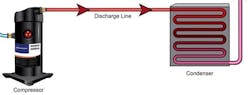
Since we already measure superheat at the evaporator outlet and compressor inlet, we call this superheat reading our discharge superheat. Discharge line temperatures are usually taken about six inches out from the compressor outlet, and they can tell you about the oil inside the compressor. If the temperatures are too high, you could have oil breakdown, which will shorten the compressor’s life since the oil can’t lubricate the compressor properly.
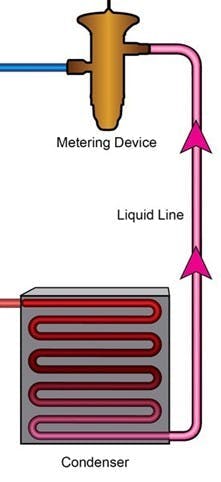
Condenser → Liquid Line → Metering Device: Subcooled Liquid
After the refrigerant has become a liquid in the condenser and dropped a few degrees further, it enters the liquid line as a warm, relatively high-pressure, subcooled liquid. This liquid line is the only line where we can measure subcooling, so whenever somebody says that we need to measure subcooling, they’re referring to the temperature of the liquid line below saturation.
Some refrigeration systems have a sight glass that tells you whether you have a full column of liquid (no bubbles, which indicates the presence of vapor); this feature is often used in lieu of subcooling, as both things can help us answer the same questions:
● Are we feeding the metering device(s) a full line of liquid?
● Are we stacking liquid in the condenser?
Both can tell us about the refrigerant charge or indicate possible restrictions in the system.
Metering Device → Expansion Line → Evaporator: Liquid-Vapor Mixture
In some cases, such as ductless mini-splits with an outdoor metering device and indoor evaporator(s), there will be a line between the metering device and evaporator called the expansion line. However, most traditional split systems have metering devices that feed straight into the evaporator coil and do not have this line.
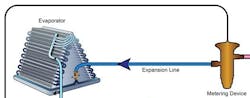
Since the metering device rapidly drops the pressure and causes some of the liquid refrigerant to boil off right away, the refrigerant in the expansion line is a cool liquid-vapor mixture. Since we don’t want to absorb any heat in the expansion line, as that would reduce efficiency, this line will be insulated, just like the suction line.
Editor's Note: Next month, Bryan Orr's Back to Basics series will conclude, discussing heat pumps, pressure, and efficiency.
About the Author

Bryan Orr
Bryan Orr is the president and co-founder of Kalos Services, a multi-trade contracting company in Central Florida. He started in the field and built Kalos from a two-person HVAC shop into a large HVAC, refrigeration, electrical, plumbing, and construction team. He also founded HVACRSchool.com, a training platform and podcast used by techs across the industry. Orr focuses on solid processes, real technical skill, and developing the next generation of tradespeople while keeping the straightforward, field-driven values he learned on service calls.