Refrigeration Service Today: Introduction to Superheat and Subcooling Diagnostics
In the last Contracting Business HotMail article on Fundamentals of HVAC Superheat and Subcooling, we discussed these readings and how to measure them. In this article, we’ll look at how you can use these invaluable measurements to diagnose what’s happening inside the refrigeration circuit. Let’s look at the four most common superheat and subcooling combinations and what they can show you.
Know Your Targets
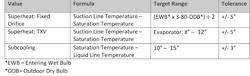
Before you can diagnose superheat and subcooling, you need target ranges. Equipment manufacturers provide this information in the installation instructions, equipment data plates, and charging calculators. In the absence of this information, use the ranges below from the previous article as a guide.
It’s important to remember that superheat and subcooling reveal the refrigerant’s state at the measurement location. If they’re within manufacturer specifications, that’s a good sign. However, if outside those parameters, there’s an issue that needs further investigation.
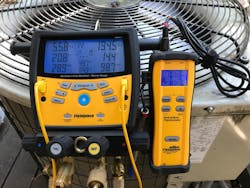
Beware of using superheat or subcooling as standalone measurements. For a clearer picture of what’s happening, I encourage you to use them together (Photo 1).
High Superheat and Low Subcooling
High superheat and low subcooling are probably the most common combination you will encounter. They reveal a system low on refrigerant charge.
The first clue of an undercharge often comes from low refrigerant pressures. But remember, pressure only shows one aspect of system operation. You still need to convert pressures to saturation temperatures. Once you combine saturation temperatures from your manifold with your refrigerant line temperatures, that’s when the diagnosis becomes clearer.
In high superheat and low subcooling conditions, the high superheat tells you there isn’t enough refrigerant in the evaporator. Low subcooling tells you there isn’t enough liquid refrigerant in the condenser.
When you find this condition, your first reaction might be to charge up the system. Don’t. Before you grab a refrigerant tank, first find the leak in the system. Refrigerant doesn’t disappear.
In high superheat and low subcooling conditions, the high superheat tells you there isn’t enough refrigerant in the evaporator. Low subcooling tells you there isn’t enough liquid refrigerant in the condenser.
Whenever I did a “gas-n-go” to get the customer cooling again, 90% of the time, I was back within a week on another no-cooling call. In my haste to get to the next call, I unintentionally cheated and disappointed those customers. Some were forgiving. Others lost their faith in me. It’s much easier to do the job right the first time.
High Superheat and High Subcooling
This combination is a perfect example of why you can’t use manifold pressures alone to troubleshoot a refrigeration problem. They will fool you every time and result in a misdiagnosis.
A system running high superheat and subcooling has a high-side restriction somewhere. The issue could be a liquid line restriction, a TXV (Thermostatic Expansion Valve) sensing bulb with no charge, a restricted metering device, or plugged filter drier.
If you were to look at manifold pressures only, you would likely notice low refrigerant pressures, just like a system that’s low on charge. However, that’s not the problem. Many technicians (myself included) have added refrigerant to systems that didn’t need it. We stopped troubleshooting once we had our pressures and failed to look at superheat and subcooling.
Just as with an undercharge, high superheat means an evaporator starved for refrigerant. However, an undercharge isn’t the problem. The high subcooling tells you there is plenty of liquid in the condenser. The high side restriction causes liquid refrigerant to back up in the condenser and not make it to the evaporator.
Before you condemn a TXV, visually inspect the liquid line and components first. If the restriction is severe enough, you might notice frosting at the point of restriction. You can also measure temperature drop across the suspected location. Any temperature change is reason enough for further investigation.
Low Superheat and High Subcooling
The third combination often reveals itself with higher-than-normal refrigerant pressures. If you pay attention to the suction line, it’s sweating and cold to the touch. The liquid line might even be hot, and the compressor is probably louder than it should be.
Once you measure refrigerant line temperatures and compare them to saturation, you’ll find the answers. The suction line temperature will be near or at saturation, while the liquid line temperature will be much higher than the saturated liquid temperature. A system with low superheat and high subcooling has too much refrigerant.
The two previous conditions we looked at had high superheat. Low superheat shows too much refrigerant in the evaporator, and it cannot boil it off fast enough. The excess refrigerant could easily make it back to the compressor and cause permanent damage from flood back and, in severe cases, slugging.
High subcooling tells you there is too much liquid in the condenser. With a high side restriction, the liquid is backing up because of the obstruction. However, with an overcharge, there is simply too much refrigerant in the system.
Two common maintenance issues that result in overcharging are:
1. Checking the charge in low load conditions in cooler, spring conditions.
2. Trying to check the charge on a condenser coil that’s still wet from cleaning.
Both conditions can fool you into thinking the system needs refrigerant.
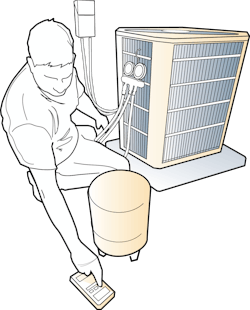
If you find an overcharged system, slowly remove the excess refrigerant with a recovery tank and digital charging scale. Be sure you track how much charge you removed from the system.
Low Superheat and Low Subcooling
This last condition can leave you scratching your head. The evaporating pressure (low side) is higher, while the condensing pressure (high side) is lower. However, once you measure refrigerant line temperatures, you’ll discover low superheat and low subcooling.
These conditions usually signal a metering device feeding too much refrigerant into the evaporator. If the system uses a TXV, it is overfeeding or stuck open. If there is a piston to meter the refrigerant, it is likely oversized.
Like an overcharge condition, low superheat means too much liquid refrigerant in the evaporator and not enough vapor. Remember, the primary purpose of a metering device is to “meter” liquid refrigerant into the evaporator.
A properly sized and functioning metering device should flash the liquid refrigerant into a partially gaseous state as it passes through the opening. When a TXV or piston overfeeds, the liquid doesn’t change to a lower-pressure vapor but remains very close to a high-pressure liquid.
When a metering device overfeeds, there is little back pressure to keep liquid refrigerant in the condenser. As a result, you will see lower condensing pressures and subcooling.
Unless you have an adjustable TXV, there is no simple solution to an overfeeding metering device. You’ll have to access the refrigerant side of the system and either replace a bad TXV or change the piston to the correct size. Be sure to follow proper evacuation procedures and measure vacuum with a micron gauge.
When Your Readings Don’t Add Up
Sometimes your readings won’t match manufacturer troubleshooting charts and basic guidelines in this article. What do you do then? The most important step is to keep your cool and don’t panic. When you freak out, you guess.
Keep the situation in context. Residential systems do screwy things when you have 90°F air moving across the evaporator. If turning on a system after it’s been down and it's 90 degrees inside and out, allow the indoor conditions to stabilize before adjusting the charge. Also, don’t forget to allow for refrigerant line length and condenser refrigerant capacity. Both will influence your readings.
Another valuable reading is to measure compressor amps and compare them to the compressor’s rated load amps. You can find this information on the equipment or compressor data plate. The amp draw indicates how much work the compressor is doing. A compressor pumping refrigerant on an overcharged system will pull more amps than an undercharged system.
One of the most frustrating situations to encounter is when the TXV hunts. The superheat and subcooling fluctuate as the valve opens and closes, starving and flooding the evaporator. This reaction is often a result of poor airflow across the evaporator.
Airflow is the missing ingredient in refrigerant testing. Ideally, it should be the first measurement you gather before grabbing a refrigerant manifold. Otherwise, you’re making a big assumption that affects the entire system.
David Richardson serves the HVAC industry as National Comfort Institute, Inc. (NCI) director of training. NCI specializes in training that focuses on improving, measuring, and verifying HVAC and Building Performance.
If you’re an HVAC contractor or technician interested in learning more about refrigerant-side performance, contact David at ncilink.com/ContactMe or call 800-633-7058. NCI’s website www.nationalcomfortinstitute.com is full of free technical articles and downloads to help you improve your professionalism and strengthen your company.
About the Author

David Richardson
Director, technical curriculum
David Richardson is the vice president of training at National Comfort Institute, Inc. (NCI), Avon, Ohio. NCI specializes in training that focuses on improving, measuring, and verifying HVAC and Building Performance.